
The 20-hour hinge
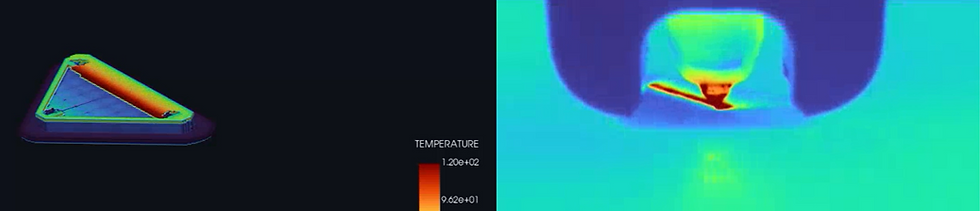
I printed a little triangular bracket in six and a half minutes. Then I spent the better part of a day watching a solver re-live every second of it, element by element — and learned more about why prints fail than a hundred successful prints had taught me.
Every hobbyist who runs a 3D printer eventually develops a sixth sense for trouble. You learn to hear a bad first layer, to spot the corner that's going to curl before it curls, to distrust tall skinny towers and sharp overhangs. But it's all pattern-matching. You know that warping happens; you rarely get to see why, because the why is a temperature field evolving inside a part that's buried under the nozzle and gone cold by the time you pick it up.
So I ran an experiment. I took a part I actually wanted — a small three-hole mounting bracket, the kind of unglamorous triangular gusset you bolt two things together with — and I printed it on my Adventurer 5M while a thermal camera watched. Then I handed the exact same G-code to our physics solver called Rheona™ and asked it to reconstruct the thermal history of the print from first principles. The idea was simple: if the simulation agrees with the camera, then the simulation can show me everything the camera can't — the heat inside the part, layer by layer, where the defects are actually born.

It is, by any measure, a trivial print. That's the point. If a part this small and this fast carries real thermal drama inside it, imagine what's happening in the parts we actually sweat over.
What the solver is really doing
Rheona doesn't simulate "a bracket." It simulates the act of printing the bracket. It reads the same G-code the printer does — in this case 7,163 motion segments, of which 5,438 actually extrude plastic — and turns the toolpath into a voxel grid. Every little cube of material gets stamped with the exact moment the nozzle would have laid it down.
Then it runs a transient heat-transfer finite-element simulation where elements are born as they're printed. At the start, the mesh is almost empty. As simulated time advances, elements switch on in the order the nozzle visits them, each one arriving hot and immediately starting to dump heat into its neighbors, into the build plate, and into the air. This is the detail that makes it honest: the part is never treated as a finished solid cooling down. It's grown, bead by bead, the way it really is.

A note on that 120 °C. PLA leaves the hot end far hotter than that, but the number the model and the camera both care about is the surface temperature of the bead the instant it's exposed to air — and that's what Rheona's deposition temperature and radiation/convection boundary conditions are tuned to reproduce. Which brings us to the interesting part.
Watching the heat move
Here is the thermal history I could never see with my own eyes. These are four moments from the same simulation, same colormap: deep blue is cool, red is hot.


A print isn't one cooling event. It's thousands of tiny ones, overlapping — each new bead a flash of heat against material that has already decided what shape it wants to be.
But is any of this real?
Pretty pictures are easy. A simulation that matches a thermometer is not. This is where the thermal camera earns its keep: while the part printed, an IR camera stared straight down the nozzle and recorded the actual surface temperatures.

Now overlay the two. Pick a single point on the part and plot its temperature over time — once from the camera, once from the solver:

That agreement is the entire ballgame. The spikes line up. The decay lines up. The camera can only ever see the surface for the few minutes of the print; the solver, now that we trust it, can report the temperature of any element at any instant, including the buried interior and the two hours of cooldown after the print "finishes."
So why do home prints go wrong?
Put the validated picture together and the common desktop-printer failures stop being mysterious:
The build plate is a heat thief
Fixed at 45 °C, the plate pulls heat out of the first layers relentlessly while the top of the part is still arriving hot. That vertical temperature gradient means the bottom contracts and sets while the top is still expanding — the exact recipe for corners lifting off the bed. On a long, thin triangle like this one, the slender tips cool fastest and pull hardest. That's where warping starts.
Reheating is a double-edged sword
Those 117 °C reheat spikes are what fuse one bead to the next. Too little reheat (thin walls, fast travel, a cold room) and the previous bead has dropped below the point where it can properly weld — hello, weak layer lines and delamination. Too much accumulated heat (tiny parts, dense infill, no cooling) and the material never fully sets between passes — hello, sagging and blobby overhangs.
Every pass leaves a stress behind
Each time material heats and cools against neighbors that are at a different temperature, it locks in a little residual stress. They add up. Most of the time they just sit there; sometimes they win, and the part cracks along a layer weeks later or bows the moment you pop it off the plate.
None of this is visible to the naked eye during a print. All of it is sitting right there in the thermal field.
The uncomfortable price tag
Here's the catch, and it's a big one. That six-minute-forty print took the solver the better part of a day to simulate. Not the eight hours I'd loosely expected when I kicked it off before bed — the log is brutally specific:

Read that again: within the solve itself, the single biggest cost wasn't the physics — it was matrix factorization, 28,000+ seconds spent refactorizing the system over 56,500 times as the mesh grew bead by bead. The actual back-solves took under an hour. That ratio is the whole secret to where this technology goes next.
Roughly 180× more time to simulate the print than to do it. For a hobby bracket that's absurd. For a part that costs real money, it's a bargain.
From my garage to the factory floor
It's tempting to look at "20 hours to simulate a 7-cent part" and laugh the whole thing off. That's the wrong lesson. The physics Rheona is solving — material born hot on a toolpath, reheated by its neighbors, locking in stress as it cools against a cold substrate — is exactly the physics that decides whether an expensive industrial build succeeds or becomes scrap. Only the stakes change.
Large-format and high-volume plastics
Scale the same bracket up to a pellet-fed large-format part, or multiply it into a packed build plate of hundreds of injection-style production parts, and the thermal interactions get worse, not better: heat from one part or one bead soaks its neighbors, warpage compounds, and a single bad parameter ruins a build worth hundreds of dollars and many hours. Running the solver first to find the warp-prone corner, retune cooling, or reorder the toolpath pays for itself the first time it prevents one failed batch.
DED and metal additive
This is where it gets serious. In Directed Energy Deposition and other metal processes, the exact same simulation — toolpath-driven, element-birth, transient thermal — predicts the residual stresses and distortion that make metal parts crack, pull off their supports, or fail qualification. A metal build can run for days and consume thousands of dollars of powder or wire. Against that, a day of compute to get it right the first time isn't a cost; it's insurance. And because the thermal history drives the microstructure, the same field that warns you about distortion also hints at where you'll get porosity or the wrong grain structure.
The compute problem is tractable
Remember that factorization bottleneck? It's not a law of nature — it's an engineering target. Reusing or updating factorizations instead of rebuilding them, switching to iterative or GPU-accelerated solvers, lumping layers together, and using reduced-order "inherent strain" methods for distortion can collapse that cost dramatically. The expensive part of my overnight run is precisely the part an industrial deployment optimizes away. What stays is the thing that matters: a validated physical model of what the heat actually did.
That's what I find genuinely exciting about an evening spent babysitting a progress bar. The same little solver that explained why my triangular bracket's tips might curl is, structurally, the same tool a shop would use to keep a $4,000 titanium part from tearing itself off the plate on hour 30 of a build. I just got to run it on something I could hold in my hand — and watch it tell the truth.
Author: Dr. Christian Rossmann


Comments